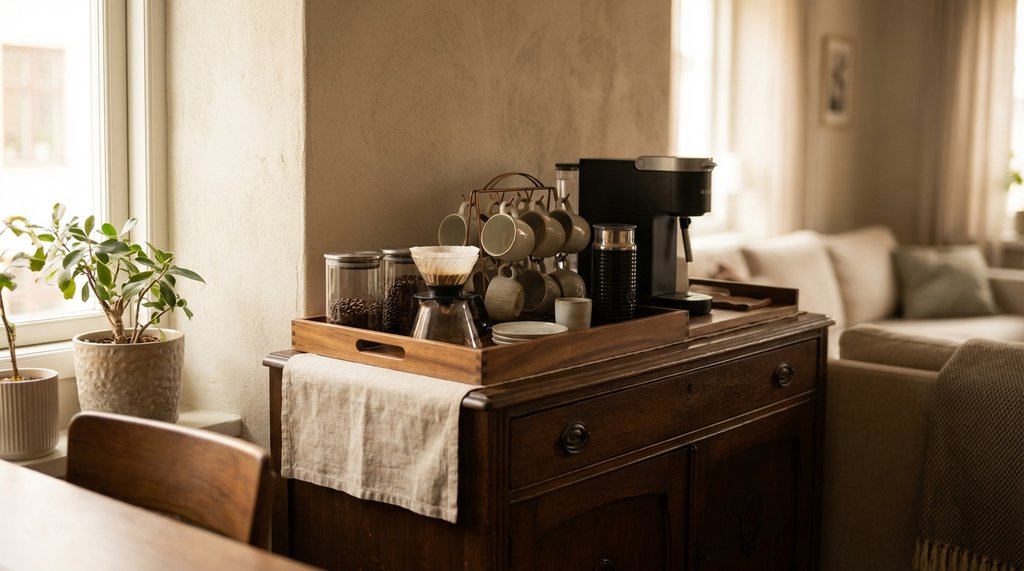
My landlord’s lease has one clause I’ve memorized better than my own phone number: No permanent alterations to the property without written consent. So when I picked up a 58-inch buffet sideboard from Facebook Marketplace for $65 last April — solid wood, three drawers, two cabinet doors, completely unremarkable in every way — and decided it was going to become my coffee station, I had to think through every single decision with that clause sitting in the back of my head.
What follows is everything I figured out over about three weekends, including two approaches I abandoned completely and one product recommendation I’ve since walked back.
Why a Sideboard Works Better Than a Dedicated Coffee Bar Furniture Piece
This is actually the non-consensus part I want to get out of the way first.
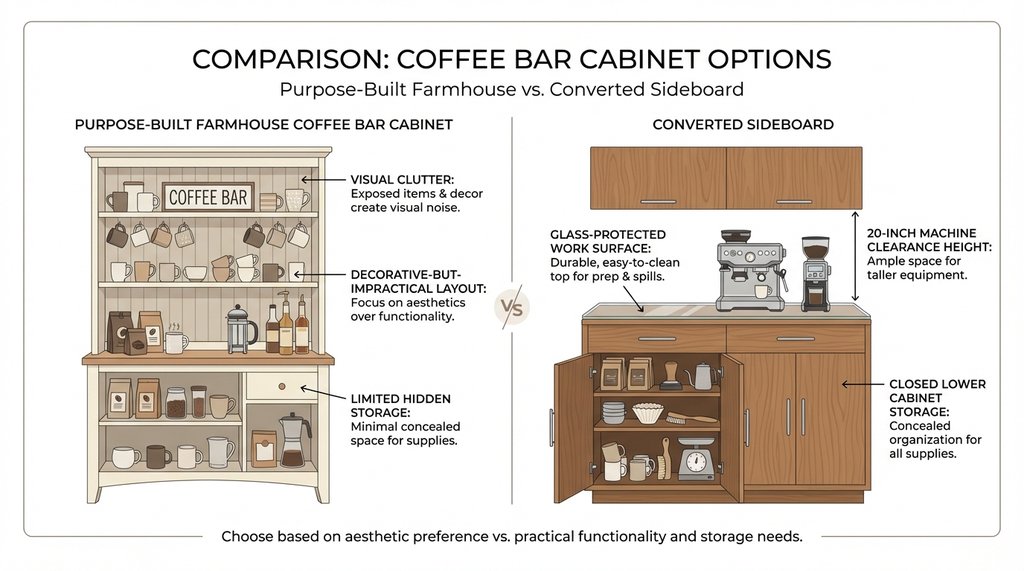
Every “coffee bar setup” article online steers you toward purpose-built coffee bar cabinets — the ones with the open upper shelving, the wine rack cutouts, the little towel bar on the front. I bought one of those first. A white farmhouse-style unit from Wayfair, around $180. Returned it within a week.
The problem isn’t aesthetics. The problem is that purpose-built coffee bar furniture is built to look like a coffee bar, not to function as one. The open shelving looks beautiful in product photos with three ceramic mugs and a single bag of coffee artfully placed. In real use, with an espresso machine, a grinder, a kettle, a tamper stand, two portafilters, a milk frother, a small scale, a knock box, and the actual daily chaos of making coffee, open shelving becomes visual noise that you can’t contain.
A sideboard with closed cabinet storage underneath gives you somewhere to hide the things you use daily but don’t want to look at — backup beans, cleaning tablets, extra filters, the tamper you’re not currently using. The top surface does the work. The cabinets do the storage. That division of labor is exactly right for a coffee setup, and purpose-built coffee furniture gets it backwards by making storage decorative.
The 58-inch width I ended up with is also meaningful. Most espresso machines sit between 11 and 14 inches deep. A Breville Barista Express with the hopper up is about 16 inches tall to the top of the bean hopper. A standard sideboard is 36 inches tall. This gives you a comfortable working height to operate a portafilter with a normal elbow position, enough that you don’t feel like you’re hunching. I measured this wrong the first time and set up on a console table that was only 30 inches tall. Pulling a shot while bent at the waist for six weeks before I fixed it was genuinely bad for my back.
The Actual Conversion: What Stays Removable
Surface protection comes first, and this is where most guides give bad advice.
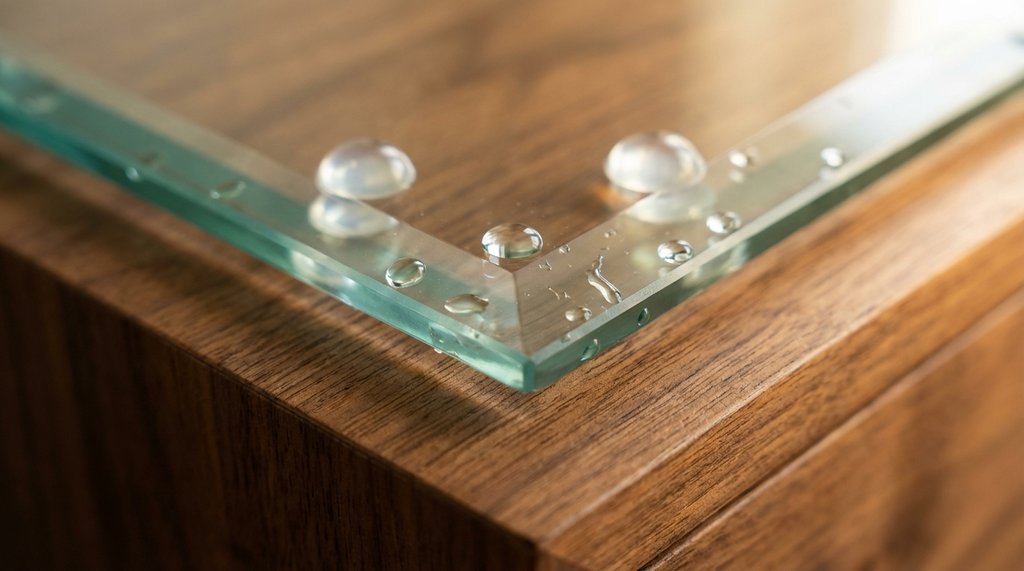
The standard recommendation is to use a silicone mat or a cutting board under your espresso machine. I used a 24×18 inch silicone mat for two months before I realized it was causing a problem specific to my setup: the mat trapped moisture underneath it. My espresso machine has a small drip tray that occasionally overflows if I don’t empty it, and that water wicked sideways under the mat rather than evaporating. By the time I pulled the mat up, the wood surface had a faint white haze — not damage exactly, but the kind of thing that makes you nervous about your security deposit.
What I switched to: a 1/4-inch thick tempered glass panel cut to 18×48 inches, sitting directly on the sideboard surface on four clear silicone bumper pads (the kind used for cabinet doors, $4 for 20 at any hardware store). The glass sits elevated 2mm off the surface. Nothing traps underneath it. Water that gets on the glass surface runs to the edge and evaporates or gets wiped. The bumper pads prevent scratching. When I leave, I take the glass. The sideboard surface is untouched.
The glass panel cost $67 from a local glass shop — they cut it to size while I waited. Getting it cut locally is cheaper than ordering online once you factor in shipping, and you avoid the anxiety of a large glass panel arriving by freight.
Electrical management without drilling.
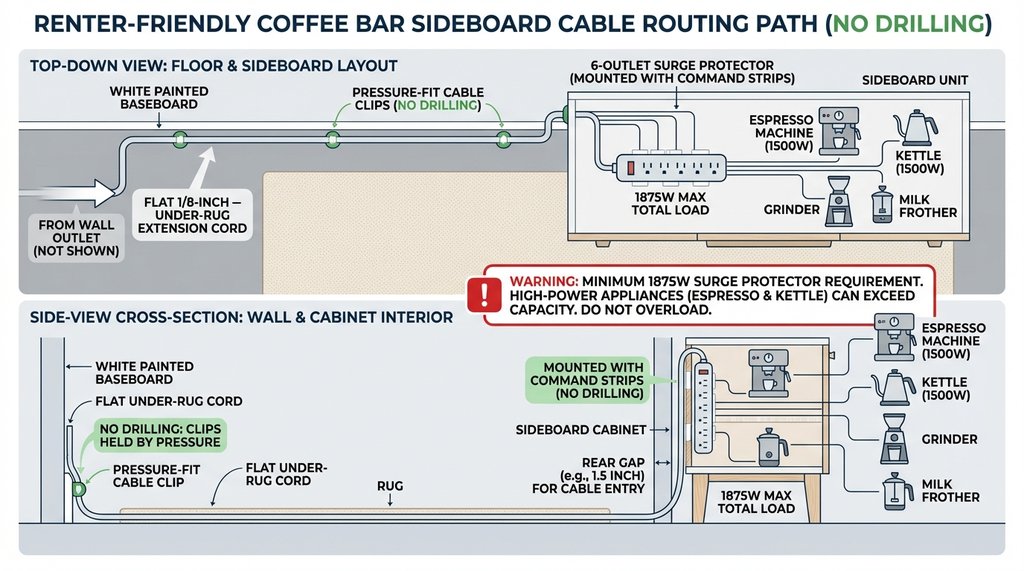
Running power to a coffee station is the part that separates a functional setup from a beautiful-but-annoying one. You need at least four outlets: espresso machine, grinder, kettle, and whatever auxiliary (milk frother, warming plate, phone charger for the timer app). Running an extension cord that’s just coiled on the floor behind the sideboard looks terrible and is a tripping hazard.
I use a flat extension cord — specifically, the kind designed to run under rugs — routed along the baseboard from the wall outlet to the back of the sideboard. The cord is 1/8 inch thick, paintable, and lies completely flat. No adhesive mounting required; I just used small cable clips that press onto the baseboard with the kind of pressure fit that doesn’t damage paint. The clips come off clean.
At the sideboard itself, a six-outlet surge protector mounts to the inside back panel of the lower cabinet using two small Command strips (the 5-pound capacity ones). The power brick sits inside the cabinet. The cord runs out through the gap at the back of the sideboard — most sideboards have a few millimeters of gap between the back panel and the wall, and a flat cord fits through this without modification. The result from the front of the room: no visible cord, no drilling, completely reversible.
One note on surge protectors — I specifically use one rated for 1875 watts (the maximum for a standard 15-amp circuit). An espresso machine with a heating element pulls 1000-1500 watts at startup. A kettle pulls another 1500 watts. Running both simultaneously will pull up to 3000 watts and cause the thermal cutoff to trip, even on a properly sized strip. I learned this the hard way on the first morning I was testing the setup, when everything went dead mid-shot, so I now make sure to only heat one high-draw appliance at a time.
Related: Best Coffee Makers for Hard Water (If you’re upgrading your renter setup)
Upper shelving without wall anchors.
This is where the renter constraint gets genuinely interesting as a design problem.
The obvious solution — floating shelves on the wall above the sideboard — requires anchoring into the wall. Even with proper patching on move-out, there’s always the security deposit conversation. I wanted to avoid it entirely.
The solution I landed on is a tension-mounted shelving system. There are a few versions of this: the BEKVÄM step ladder from IKEA used as a leaning shelf ($25), purpose-built leaning ladder shelves, and freestanding shelf units that sit on the sideboard top itself.
I tested all three. The leaning ladder approach looks good but has a physics problem: as you load the upper shelves with heavier items (a bag of coffee is heavier than it looks), the center of gravity shifts back, and the lean angle changes. On hardwood floors, mine walked forward about 2 inches over three weeks. Not dangerous, but not acceptable either. I added rubber furniture cups under the front feet and a small rubber-tipped hook at the top that rests against the wall without marking it, which solved the movement problem — but that started feeling like engineering around a bad idea.
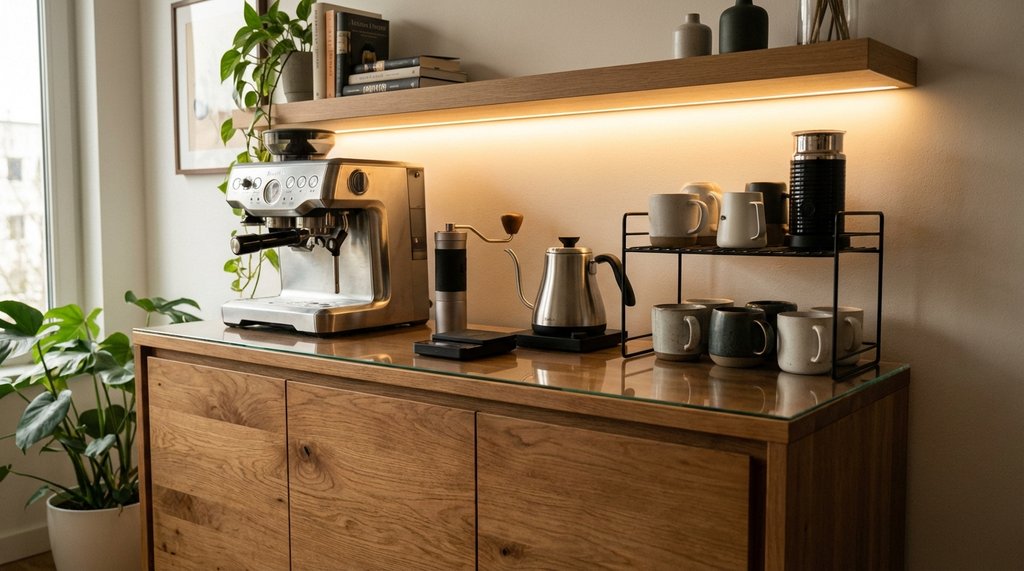
The freestanding shelf unit that sits on the sideboard top works well if your sideboard is deep enough. Mine is 18 inches deep. The small freestanding shelves designed for countertop use are typically 10-12 inches deep, which leaves 6 to 8 inches of sideboard surface in front of the shelf — enough to stage a mug, a small plant, a bag of coffee. The unit I use is a black wire shelf, two tiers, 10 inches deep by 24 inches wide. It holds a milk frother on the upper tier and a small collection of mugs on the lower. The wire construction means it can’t hold fine particles but looks intentional rather than utilitarian.
For actual beans and tool storage that I want at eye level, I use wall-hanging pegboard panels — but mounted to the sideboard itself, not the wall. I screwed (using the existing screw holes in the sideboard’s back panel, no new holes) two 12-inch-tall pieces of pegboard to the inside back face of the open cabinet section. The pegboard sticks up above the cabinet line by about 4 inches and rests against the wall without any wall attachment. Hooks hold portafilters, tampers, a brush. This has been stable for five months.
Inside the Cabinets: Organization That Survives Daily Use
The lower cabinet section of most sideboards is one open shelf with a single fixed horizontal divider, or no divider at all. Mine had nothing — just a 28-inch wide by 13-inch deep by 26-inch tall cavity on each side.
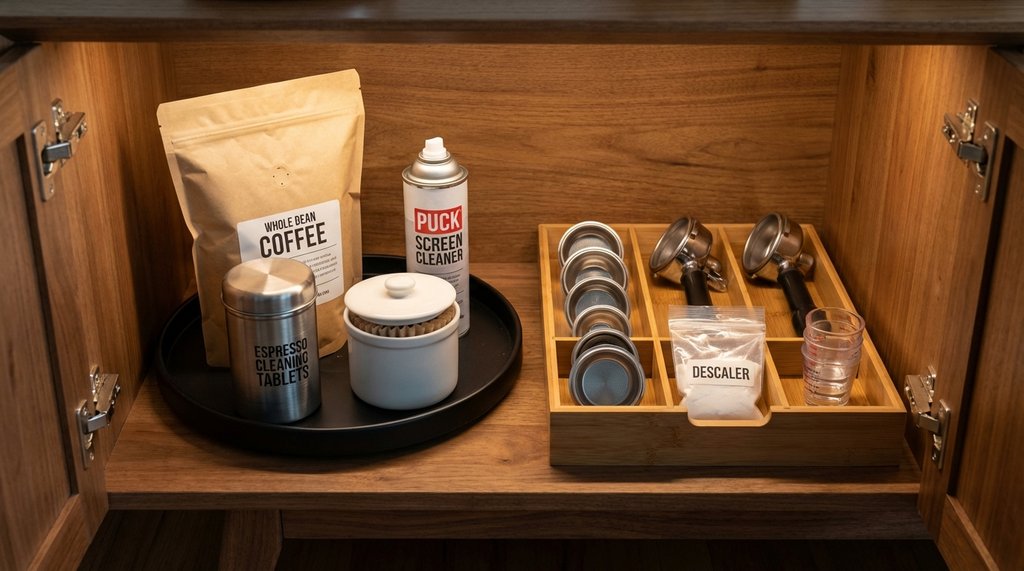
The left cabinet holds consumables. I use a turntable (lazy susan) rated for 250 lbs — the heavy-duty kind used for kitchen cabinets, not the decorative serving plate kind — sitting directly on the cabinet floor. On it: a 5-lb bag of beans, a can of puck screen cleaner, a bag of cleaning tablets, and a small container of backup filters. The turntable means I can reach anything in the back without removing items in the front. The one I have is 12 inches in diameter, which fits the 13-inch cabinet depth with 0.5 inches to spare on each side.
The right cabinet holds equipment I use occasionally but not daily: a second portafilter basket collection (I have seven baskets and only use two regularly), a small bag of descaler, the plastic shot glasses I use for calibration, and a drawer organizer repurposed to hold loose accessories upright. None of this is permanently installed. I could pack it all into a single cardboard box in about four minutes.
The drawers — my sideboard has three — I’ve assigned by use frequency. Top drawer: things used every single day without fail (tamper, WDT tool, paper filters for the V60, a small scale). The scale is a Timemore Black Mirror Basic+, which is about 6 by 5.1 inches and 1 inch thick, so it lies flat without wasting space. Middle drawer: documentation I might actually need (manuals, warranty cards, the receipt for the glass panel). Bottom drawer: overflow and rarely-used items.
Lighting, Which Nobody Talks About
Under-cabinet lighting is how coffee bars in cafés make everything look intentional. At home, in a rental, with a sideboard that has no built-in electrical, the standard approach is battery-operated LED strips.
I’ve tried three types. The peel-and-stick strips that run on AA batteries overheat slightly after 30 continuous minutes — not dangerous, but they dim noticeably. The rechargeable wand lights (the kind marketed for closets) work well but have a motion sensor trigger that turns them on when you walk past, which is annoying at 6am when you just want to exist in your kitchen. The version I’ve landed on is a USB-powered LED strip, plugged into the same surge protector inside the cabinet, routed through the back-panel gap. The strip adheres to the underside of the top shelf of the freestanding wire unit with the included 3M tape. No Command strips required because there’s no painted surface involved. The USB plug controls power, and I’ve wired it to a small smart plug inside the cabinet so it turns on with a voice command.
This sounds complicated but takes about 20 minutes to set up and involves zero permanent anything.
The Honest Assessment After Five Months
What surprised me: the most fragile part of this whole setup is the coffee itself, not the furniture engineering. The sideboard sits on an exterior wall, and in January the wall surface temperature drops enough that the beans stored inside the cabinet — which is up against that wall — were experiencing slight temperature fluctuations. I measured the cabinet interior temperature at 62°F one night, 71°F the following midday. Over a week with fresh light roast beans, I could taste the difference between this bag and an identical bag stored in a more stable interior location. The fix was a small piece of 1/4-inch foam insulation cut to fit the inside back panel of the left cabinet, held in place by nothing except the weight of the lazy susan against it. Temperature swings dropped to about 4°F peak-to-peak.
What I’d do differently: the glass panel is the single best decision in this entire project, and I should have started with it instead of spending two months on the silicone mat. If you take nothing else from this: cut glass, clear bumper feet, zero adhesive. The local glass shop was faster and cheaper than any online option I found, and the person who cut it also pointed out that 1/4-inch tempered is overkill for this application — 3/16-inch would have been fine and saved me $11.
What genuinely doesn’t matter as much as the internet suggests: the decorative styling. Every coffee bar transformation article spends enormous time on the aesthetic layer — the chalkboard sign, the matching canister set, the coordinating linen napkins. All of that is fine, but none of it affects function, and none of it requires any of the careful reversible engineering above. Do the infrastructure right first. Style is easy.
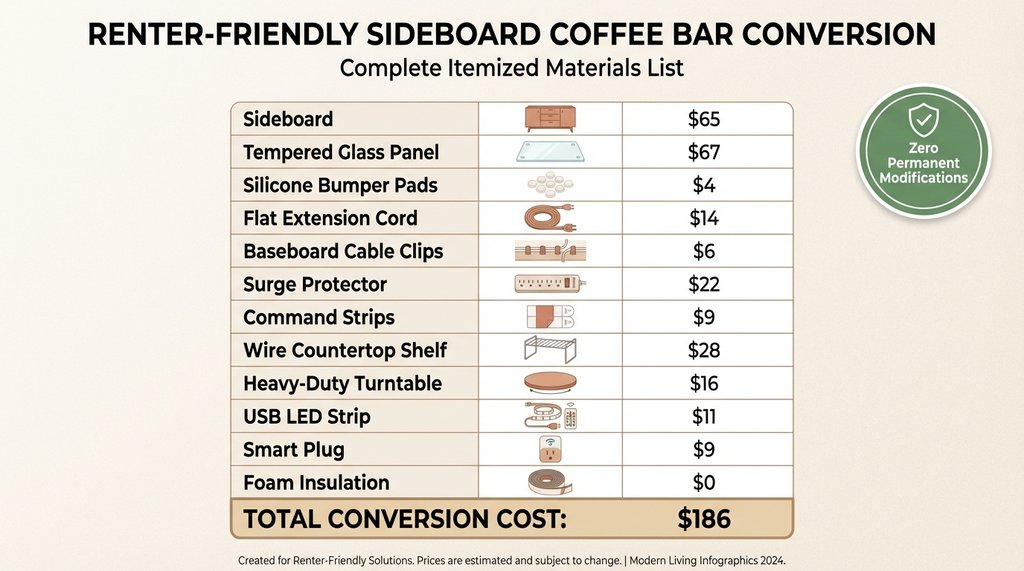
Full Materials List (With Real Prices From When I Bought Them)
- Sideboard (Facebook Marketplace): $65
- Tempered glass panel, 18×48 inches, 1/4-inch (local glass shop): $67
- Clear silicone bumper pads, 20-pack: $4
- Flat under-rug extension cord, 10 feet: $14
- Baseboard cable clips, 20-pack: $6
- 6-outlet surge protector, 1875W minimum: $22
- Command strips, 5-lb capacity, 12-pack: $9
- Countertop wire shelf, 10×24 inches: $28
- Heavy-duty turntable, 12-inch, 250 lbs: $16
- USB LED strip, 3.3 feet: $11
- Smart plug, single outlet: $9
- Cabinet foam insulation panel (cut from leftover): $0
Total beyond the sideboard itself: $186
The only thing on that list that touches the sideboard with any permanence is the Command strips inside the cabinet holding the surge protector — and those are rated to come off painted surfaces without damage, let alone the lacquered interior of a furniture cabinet.