
The grind started sounding wrong on a Tuesday morning mid-service — not the catastrophic clatter of a loose burr carrier, but that particular inconsistent spitting noise that sits somewhere between a calibration issue and a mechanical fault. The kind of sound that makes an experienced technician pause and actually listen instead of just adjusting and moving on. This was a Jura Giga X8 that had been in continuous commercial use for about fourteen months, and the grind dose was swinging between 6.8g and 8.3g on consecutive pulls without any manual intervention. That range, on a machine that should be holding within ±0.2g, tells you something is wrong — it just doesn’t tell you what yet.
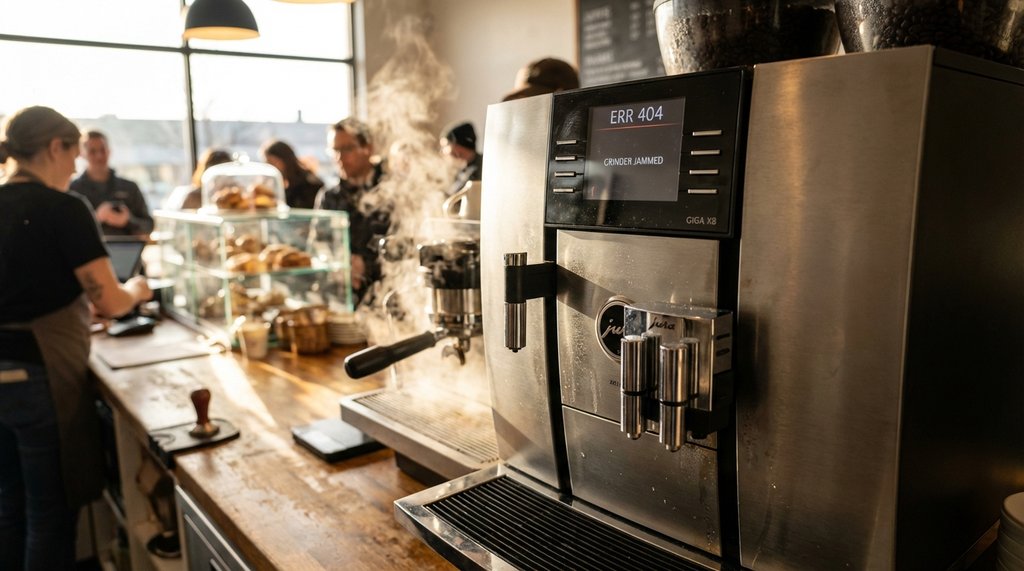
That’s the actual diagnostic problem. Both a burr alignment fault and a bean presence sensor misread produce almost identical downstream symptoms: inconsistent extraction time, variable grind weight, user-facing error codes that are vague (on Jura machines, you’re often looking at a generic Error 8 or a grinder module warning that doesn’t discriminate between causes), and a grind texture that looks fine to the eye but behaves differently under tamping pressure. Chasing the wrong root cause here costs time, and if you start pulling burr sets unnecessarily on a machine that’s actually suffering from a bean presence sensor giving bad feedback to the dosing algorithm, you’ve disassembled a functional grinding mechanism for nothing.
Here’s the decision tree I’ve actually used, refined across maybe thirty cases over three years of working on bean-to-cup equipment.
Branch Point Zero: Before You Touch Anything
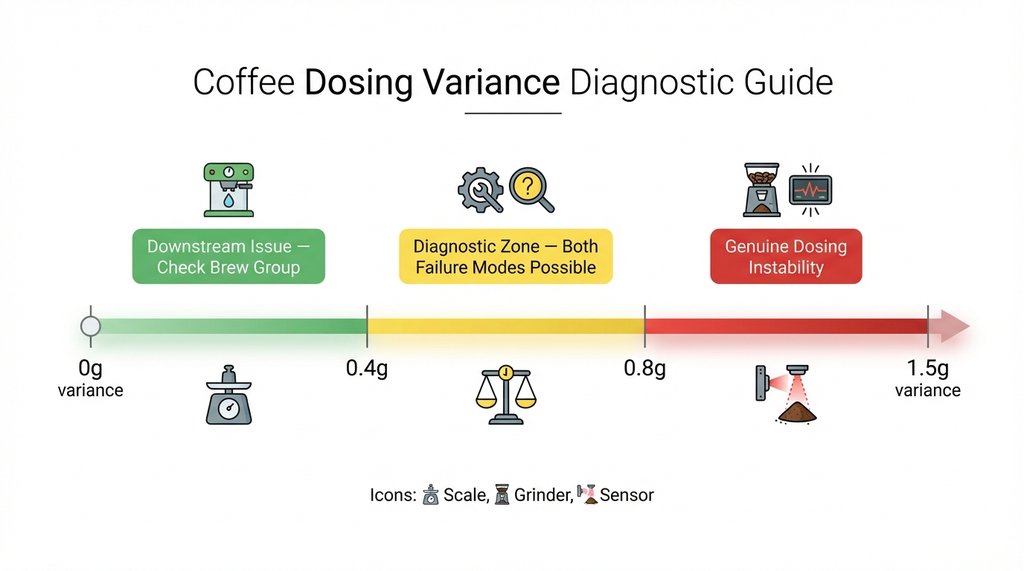
Run ten consecutive single-shot cycles with the same bean batch and log the actual grind weight on a 0.1g resolution scale. Not the machine’s internal dose reading — the actual output weight on a Brewista or similar. Write down all ten numbers.
If the variance is greater than 0.8g across the range, you have a genuine dosing instability. If the variance is under 0.4g but you’re seeing inconsistent extraction, your problem is probably downstream of the grinder entirely and neither of these branches applies — go look at your brew group seal or check pump pressure first.
Variance between 0.4g and 0.8g is the messy zone where both failure modes live.
Branch One: The Bean Presence Sensor Path
The bean presence sensor (sometimes called the active bean monitor depending on manufacturer documentation) sits in the hopper throat on most integrated grinder platforms. Its job is to monitor the bean supply to prevent empty grinding, and on some commercial platforms, its signal interacts with the dosing algorithm. On Franke, WMF, and Jura commercial units, when it misreads due to contamination, the machine may prematurely interrupt the grind cycle or make erratic real-time adjustments based on phantom empty-hopper signals — which produces exactly the kind of irregular variance you’re trying to diagnose.
Indicator pattern for bean presence sensor misread:
The variance you logged in Branch Zero will be non-monotonic. Pull ten shots and the weights will look something like: 7.4, 7.9, 7.2, 8.1, 7.5, 8.0, 7.3, 7.8, 7.2, 8.2. Notice there’s no direction to the drift — it’s not steadily increasing or decreasing, it’s oscillating. That oscillation is the sensor sampling inconsistently and the algorithm overcorrecting in both directions.
Contrast this with a mechanical burr problem, where the variance tends to have drift direction — either consistently trending heavier as a worn burr carrier wobbles progressively wider under grinding pressure, or trending lighter if a spring-loaded tensioning mechanism is fatiguing.
To confirm a sensor issue without pulling the hopper apart immediately:
- Remove the beans and clean the hopper throat completely — use a dry brush, not compressed air, because you don’t want coffee dust blown further into the sensor housing. Let it sit for twenty minutes.
- Refill with a fresh batch from a sealed bag and re-run your ten-shot test.
- If variance drops below 0.4g, you almost certainly had bean dust or oil residue fouling the sensor’s optical or capacitive element, and a full hopper cleaning cycle will resolve it.
- If variance stays elevated, remove the hopper and inspect the sensor face directly. On most Jura commercial units the sensor is accessible from the hopper base — you’re looking for a small optical window or a pair of capacitive plates depending on model year. The pre-2020 Jura Giga line used optical IR sensors that visibly discolor when contaminated with coffee oil. The post-2020 units shifted to capacitive sensing, which fails differently — look for physical damage to the sensor housing or corrosion on the contact pins.
The non-consensus point here: Most online guides and even some manufacturer training materials recommend recalibrating the bean sensor before inspecting it physically. In my experience, calibrating a fouled sensor is a waste of fifteen minutes. The calibration routine on a Jura commercial unit will technically complete successfully even when the sensor element is half-coated in rancid oil film. The calibration just teaches the machine a new baseline for a broken sensor. Clean first, calibrate after.
The one time I reversed this sequence — I was working on a WMF 1500S with a persistent dosing error, ran the calibration first because that’s what the WMF service bulletin recommended, the error cleared, the machine went back into service, and eleven days later the same fault returned. Went back in, found the sensor face was visibly contaminated, cleaned it, recalibrated, and it held for the remaining contract term. The bulletin’s order of operations was wrong for that specific failure mode.

Branch Two: The Burr Alignment Path
This is the branch most technicians default to, which means it gets over-diagnosed. Before concluding you have a burr alignment problem, the bean presence sensor path above needs to be genuinely ruled out, not just skipped because burr work feels more satisfying.
That said, here’s what actual burr misalignment looks like in practice.
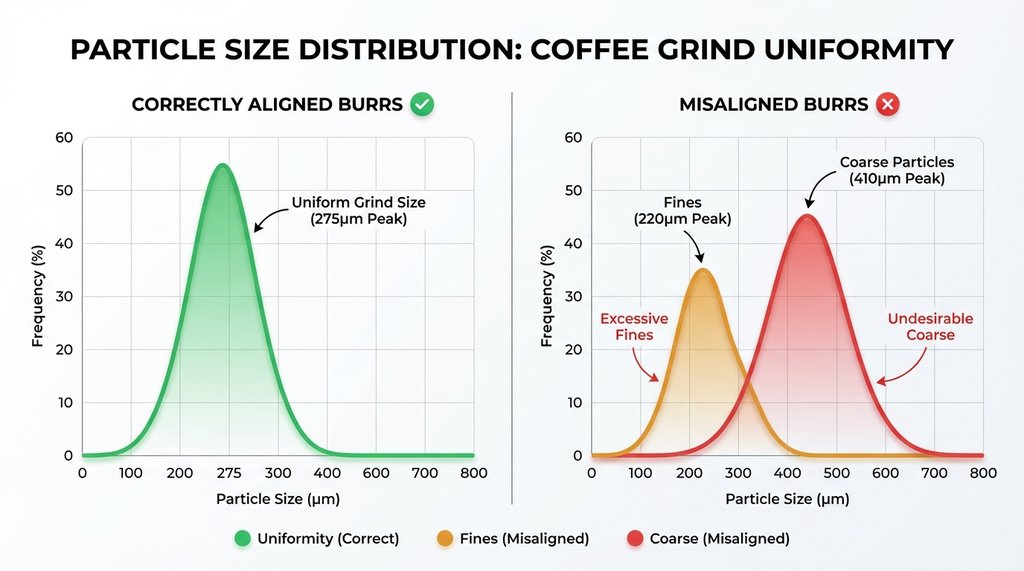
Pull a grind sample onto a white piece of paper — not a portafilter, just a flat white surface. You’re looking at particle size distribution visually. A correctly aligned burr set produces a relatively uniform particle cloud with a predictable peak around your target grind size. Misalignment produces an abnormal “bimodal output” — you’ll see both very fine powder (fines) and noticeably larger chunky particles in the same sample. The fines ratio looks too high. When you press the sample lightly with a flat card, the texture feels gritty in patches rather than consistently silky.
If you have a particle size analyzer available, misalignment typically shows up as a fragmented distribution with two coarse peaks separated by more than 150 microns when you’re grinding at espresso settings. I’ve measured this on a WMF 1500S that came in complaining of bitter shots — the distribution peak was bimodal at approximately 220μm and 410μm, when a properly aligned burr set at that grind setting should be producing a clean primary peak around 250–300μm with a controlled fines ratio.
The physical confirmation test:
With the machine powered down and unplugged, remove the upper burr carrier. Most bean-to-cup machines give you access without full disassembly — on De’Longhi integrated units, grinder access requires removing the top and rear housing panels. On Jura units it requires removing the bean hopper and the top housing using a proprietary oval tool, which is annoying but takes about four minutes once you’ve done it twice.
With the upper burr carrier removed, place it face-down on a flat surface (a piece of glass works well). It should sit completely flat — zero rocking. If you can slide a 0.1mm feeler gauge under any edge, the carrier has warped or the burr is improperly seated. If the carrier itself is flat but the grinding surface shows uneven wear — you’re looking for one side visibly more worn than the opposite side — you have a carrier alignment problem originating from the lower burr’s mounting position.
Check the lower burr mount by reinstalling the upper carrier and manually rotating it while applying light downward pressure. You should feel smooth, consistent resistance around the full 360° rotation. Any rough spot, gritty catch, or varying resistance indicates either foreign matter (a stone or metallic fragment is common in commercial environments) or physical damage to the lower burr surface.
One specific scenario where standard burr alignment procedure fails:
On machines using a spring-tensioned upper burr carrier — several older WMF models use this design — the standard flat-surface test misses a specific failure mode where the spring itself has partially collapsed on one side, creating a dynamic misalignment that only manifests under load. The burr carrier sits flat when you test it statically, so you conclude the alignment is fine, but under the grinding load of actual beans, the weakened spring lets the carrier tilt microscopically toward the collapsed side. I went through two full rounds of “cleaning, inspecting, finding nothing wrong” on a WMF 800 before I thought to actually compress the spring assembly by hand and measure the resistance at four points around the circumference. One quadrant was noticeably softer — the spring coil had developed a stress fracture. That’s a part replacement, not an alignment correction.
The Actual Decision Tree (Condensed)
Grind weight variance > 0.4g across 10 consecutive pulls?
│
├── YES
│   │
│   ├── Is the variance pattern oscillating (no drift direction)?
│   │   ├── YES → Suspect BEAN PRESENCE SENSOR. Clean hopper throat first.
│   │   │         Then recalibrate. If variance persists → inspect sensor physically.
│   │   │
│   │   └── NO (variance drifts consistently heavier or lighter)
│   │       → Suspect BURR MECHANICAL. Proceed to visual grind sample test.
│   │
│   └── Grind sample shows abnormal bimodal particle distribution?
│       ├── YES → Confirm burr alignment. Static flat-surface test on upper carrier.
│       │         Check lower burr under load if static test is clean.
│       │
│       └── NO (uniform distribution, just variable weight)
│           → High probability bean presence sensor. Also check hopper agitator
│             mechanism — a failing agitator creates inconsistent bean feed
│             that mimics sensor misread on the dosing output.
│
└── NO (variance under 0.4g)
    → Grinder is not your problem. Check brew group, pump, or
      flow meter before opening the grinder.
The One Misdiagnosis Pattern That Burns People Consistently
High-humidity environments — a coffee bar running multiple steam wands near the grinder intake, or a machine positioned near a commercial dishwasher exhaust — create a compound failure mode where both systems are degraded simultaneously. The bean presence sensor is reading abnormally because ambient humidity is genuinely elevated and oil uptake on the beans is higher, rapidly fouling the sensor optics. And the burrs are wearing faster because wet grounds are harder on the grinding surfaces. You get a sensor-driven oscillating variance layered on top of a mechanical drift.
In this scenario, the oscillating vs. drift-direction diagnostic from Branch Zero breaks down, because you have both signals present and they’re masking each other. If you’re in a high-humidity environment and neither path gives you a clean diagnosis, do both interventions in sequence: sensor cleaning and recalibration first, then burr inspection. Don’t try to do them simultaneously — you’ll lose track of which fix resolved what, and you won’t know what to monitor going forward.
The other tell for a compound failure is that your variance numbers will be large — routinely above 1.0g swing across ten pulls. A pure sensor misread rarely produces more than 0.9g variance in my experience. A pure burr misalignment rarely produces more than 0.7g unless the damage is severe. When you’re seeing 1.2g–1.5g swings, start thinking about whether the environment itself is part of the problem before you chase either component in isolation.