My Keurig K-Elite sat on the counter for three days before I figured out what was actually wrong with it. Every brew cycle ran — the lights came on, the pump hummed, water heated to temperature — but what came out of the spout was a sad, watery trickle that barely covered the bottom of my mug. I assumed the machine was dying. I was about to buy a replacement.
The actual problem was a needle clogged with dried coffee grounds and mineral buildup, and the fix took eleven minutes.
What “Not Piercing Correctly” Actually Looks Like
Before you pull out any tools, make sure you’re dealing with a needle issue and not something else. The symptoms cluster pretty specifically:
- Pod is punctured on top but you’re getting very little liquid output — less than a third of a normal cup
- Pod is completely unpunctured on the bottom after the brew cycle (pull the used pod out and flip it over; the exit hole should be there)
- Grounds are showing up in your coffee when they never used to
- You hear the machine run normally but the cup barely fills
- Coffee tastes like hot water with a memory of flavor
If your machine is making a grinding or clicking sound it never made before, that’s a different problem — likely a pump issue, not the needles. If water is leaking from the pod holder area, that’s a different problem too, usually a cracked gasket.
The needle failure I’m describing is specifically a flow restriction caused by buildup. The entry needle (top) or exit needle (bottom) — or both — are partially or fully blocked.
The Part Most Guides Get Wrong
Almost every article I found about this told me to use the orange needle-cleaning tool that comes with newer Keurig models, fill it with water, and run it through the machine. That works fine as a maintenance measure when nothing is actually wrong yet.
When the needle is genuinely clogged — as in, you can see dried coffee grounds packed in there or the flow is already compromised — that tool does almost nothing. I ran it through four times. My output volume went from about 2 oz to maybe 3 oz when it should have been 8 oz. The tool just doesn’t generate enough mechanical pressure to dislodge compacted buildup.
What actually works is manual cleaning with a thin implement first, then the rinse tool after.
What You Need
Nothing specialized:
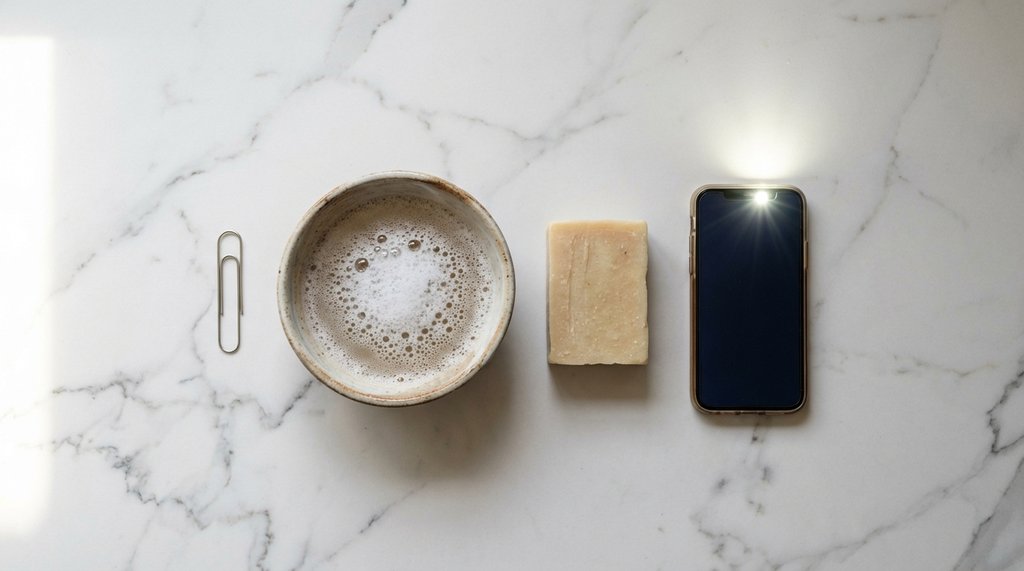
- A straightened paper clip (or the Keurig maintenance tool if you have it, but paper clip works better in my experience for actual clogs)
- A small bowl or mug
- Dish soap
- Warm water
- A flashlight or your phone’s torch
Do not use a toothpick. It will break inside the needle and make the problem worse. I learned this the hard way on a different machine — spent twenty minutes fishing splinters out of a needle housing with tweezers.
Step 1: Power Down and Let It Cool — This Matters More Than You Think
Unplug the machine. Don’t just turn it off with the button — unplug it from the wall.
Wait at least 30 minutes if you’ve recently brewed. The internal boiler in a K-Elite holds water at around 192°F during operation. The needle housing sits directly above the pod chamber, and even after the brew cycle ends, that area stays hot enough to cause a minor burn if you’re working inside it without thinking.
I used to skip this step. One time I touched the top needle housing about 15 minutes after a brew and it was still hot enough that I pulled my hand back fast. After 30 minutes it’s fine to handle.
Step 2: Open the Pod Holder and Remove All the Parts
Lift the handle like you’re going to insert a pod. Then, instead of inserting a pod, look at the pod holder assembly — the plastic basket that holds the K-Cup.
On most Keurig models made after 2014, the pod holder pulls straight out. Grip it firmly and pull straight up. It will pop free. Don’t yank — it should come out with moderate steady pressure.
Once the pod holder is out, you’ll see it separates into two pieces: the upper pod holder basket and the lower funnel. Simply pull the funnel down and away from the basket to snap it off.
Set these aside in your small bowl of warm soapy water. They can soak while you work on the needles.
Step 3: Find Both Needles
There are two needles, and both can clog.
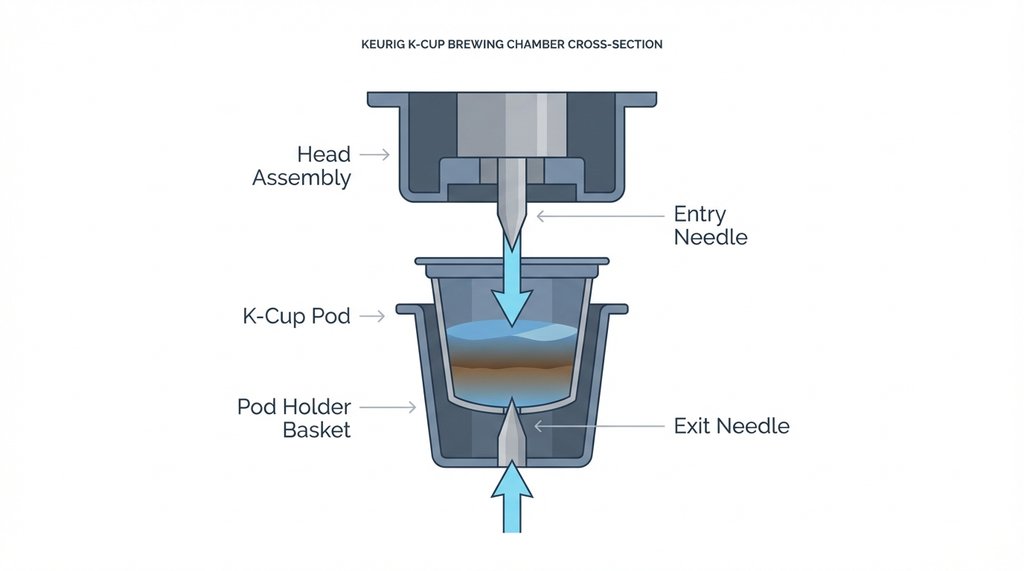
The entry needle is at the top — it’s what punctures the foil lid of the K-Cup when you close the handle. Look up into the underside of the head assembly (the part that comes down when you close the lid). You’ll see a sharp metal point. Shine your flashlight at it. Look closely at the needle itself — you will see two small holes on the sides of the needle shaft. That’s where water flows through the needle and into the pod.
The exit needle is located inside the bottom of the pod holder you just removed. Look down into the pod holder basket. There’s a needle pointing upward in the center.
Both need to be checked.
Step 4: Clear the Entry Needle
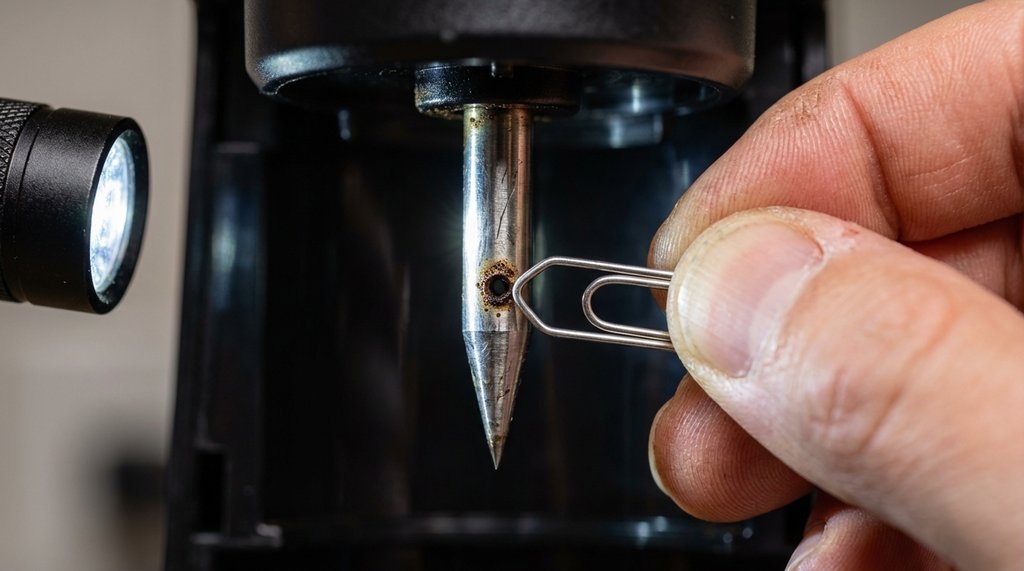
Take your straightened paper clip. You want about 1.5 inches of straight wire to work with — bend the rest to give yourself something to hold.
Insert the end of the paper clip into the small holes on the sides of the entry needle itself. On most machines there are two holes on the needle shaft. You are poking directly into the holes on the needle where the water flows through.
Move the paper clip in a circular motion, then in and out, about 5–8 times. You will almost certainly dislodge visible brown gunk. Don’t be alarmed by how much comes out — on a machine that hasn’t been cleaned in six months or more, you can get a solid 2–3mm plug of compacted grounds.
Then reinsert and repeat on the other hole if there are two.
Wipe the area with a damp cloth. Shine your flashlight up at the needle again — the hole should look visibly open, not dark and obstructed.
Step 5: Clear the Exit Needle
The exit needle is inside the pod holder you removed earlier. With the funnel detached, you have clear access to the bottom of the exit needle.
Same technique: insert the straightened paper clip gently into the small tube opening at the bottom of the pod holder basket (which leads up into the exit needle), move in circles, pull out, repeat. The exit needle tends to clog with a combination of dried grounds and mineral scale, especially if you’re in a hard-water area. If you live somewhere with water hardness above around 180 ppm — which covers most of the Midwest and Southwest — you’ll find this needle builds up faster than the entry needle.
The buildup here is often harder and more calcified than at the entry needle. If the paper clip isn’t moving freely, don’t force it. Soak a cloth in white vinegar, wrap it around the needle housing, and let it sit for 10 minutes before trying again. The acidity breaks down mineral scale enough that the paper clip will move through it.
Step 6: Reassemble and Run a Rinse Cycle
Rinse the pod holder pieces you had soaking — the soap and water soak for 15–20 minutes usually gets all the residue off. Rinse thoroughly, shake them dry, reassemble the funnel back onto the basket (it snaps back on), and reinsert the whole pod holder into the machine.
Plug the machine back in. Fill the reservoir with fresh water.
Run two rinse cycles without any pod in place. If your machine has a “hot water” or rinse function, use that. If not, run the smallest cup size setting with an empty pod holder and no K-Cup — some machines will run this without a pod, some will complain, so check your model.
The first rinse will likely come out murky or slightly brown. That’s normal — you’re flushing out the dislodged debris.
The second rinse should run clear and at full volume. Full volume means the water flows fast and fills your 8 oz setting in about 25–30 seconds. If you’re timing it and it’s taking 60+ seconds to fill, there’s still a restriction somewhere.
Step 7: Test With an Actual Pod
Brew a real K-Cup. Check two things:
- Pull the used pod out and look at the bottom. There should be a clean puncture hole in the center of the plastic bottom. If there’s no hole, the exit needle isn’t reaching the pod — this can indicate the pod holder isn’t seated correctly, or on rare occasions the exit needle is bent.
- Check your cup volume. An 8 oz setting should yield about 7.5–8 oz of liquid. If you’re getting less than 6 oz consistently, run the paper clip through both needles one more time — sometimes the first pass dislodges a partial clog that then shifts and creates a new restriction.
If It’s Still Not Working After This
At this point, the clog is either severe mineral scale that manual cleaning and vinegar didn’t fully address, or the issue is something other than the needles.
Run a full descale cycle. Keurig sells their own descaling solution, which is basically diluted citric acid — works fine. You can also use undiluted white vinegar: fill the reservoir halfway with vinegar, run brew cycles until it’s empty, let the machine sit for 30 minutes, then run two full reservoirs of fresh water through to flush. This will handle scale that the paper clip couldn’t mechanically dislodge.
If you’ve done the manual cleaning and a full descale and you’re still getting low volume, the problem is probably the pump — specifically, the pump check valve getting stuck. That’s a repair that involves disassembly beyond the pod holder, and honestly it’s a judgment call whether it’s worth it based on how old the machine is. A K-Elite bought in 2019 that still has partial pump function is worth fixing. The same machine bought in 2016 is probably past its reasonable service life for internal repairs.
Ongoing Prevention: The Honest Version
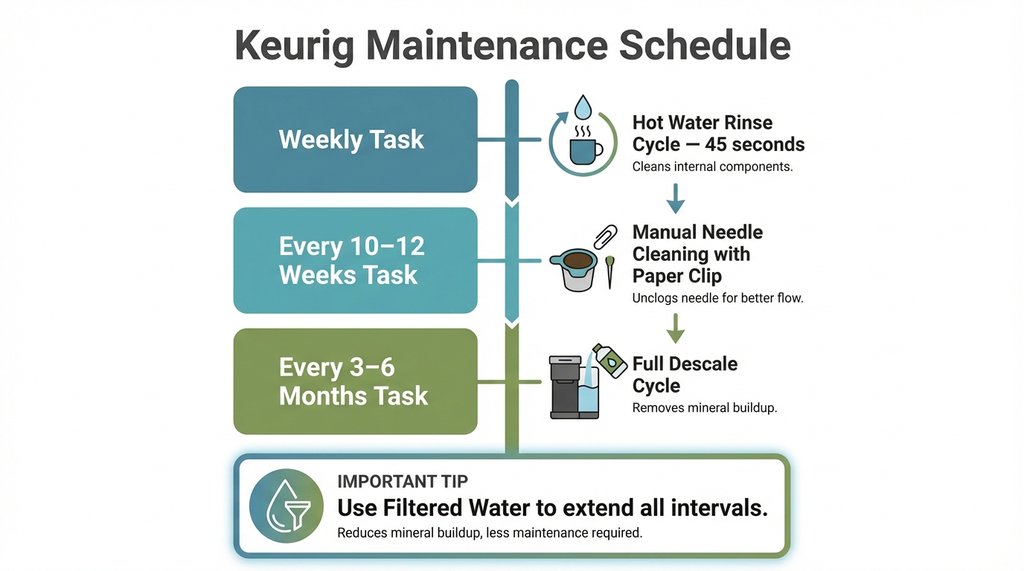
The Keurig maintenance guides recommend descaling every three to six months. In my experience, if you’re in a hard-water area and you brew daily, three months is already late — you’ll start seeing marginal flow restriction around the 10–12 week mark.
The single most effective thing I’ve done to extend cleaning intervals is switching to filtered water. I use a Brita pitcher now for refilling the reservoir. Before that, I was cleaning the needles every 6–8 weeks in my house; after the switch, I went about five months before any noticeable change in brew volume. The mineral scale is the main driver of needle clogging — the coffee grounds are actually secondary, and grounds alone won’t create a full blockage the way calcified scale can.
Running a plain hot water cycle through the machine once a week also helps. It keeps the residual coffee oils from drying and hardening inside the needle housing. Takes about 45 seconds and adds meaningfully to the interval between full cleanings.